Monday 25 January 2010

A Starry Night?

Hello everyone - how's things?

First off, a new follower who has taken time to join since the last post is - Freya - whom I welcome and thank, appreciating your efforts, plus the cheeky threat that you may even get round to reading the blog. That just fills me with encouragement - hahahahah!

After my last post which featured a Van Gogh, I thought about making the dubious link between a second work of his - Starry Night and tonight's Life Drawing Group. This is the second of his works that I have done, and is also on a 24"x18" stretched canvass, wrap-around painted and is not framed or mounted etc. I did it using acrylic paint, maybe 2 years ago at the time of writing, and must readily admit - it was a lot harder to work on than I imagined!

On first looks, this seemed a reasonably straightforward piece to do - few swirls etc, but with all truly great Masters, they are a lot harder and more complex than you ever initially thought.

Nothing worth it's while is ever easy, and that is exactly what I discovered working on this, but I also learned how to understand his style of painting a little, and now appreciate this type of work that much more.

So there you have it - two great paintings by one truly great artist (his - not mine!), but I hope you have anjoyed my attempts at his work.

It is something that anyone can actually have a go at. You don't have to be an expert at anything artwise - just find a work you like (hopefully a simple one to start with), look very closely and study it before you attempt anything, then just go for it - nothing ventured nothing gained is the phrase. One saying a TV artist always used - "If you get a painting or sketch wrong, what does it matter, what have you done except waste a piece of paper?" I am sure you will enjoy it, and learn into the bargain.

Oh - and the link with tonight's Group? - I hope it's a "starry night" as far as my sketching goes!

Whatever your art - enjoy it. Until next time,

Paul

Thursday 21 January 2010

Van Gogh

G'Day (I'm in Australian mode!)

No new followers of the blog since last time, so none to mention  ............................

Earlier this week I posted that recently I made a sale of one of my works - and seeing that the photograph of it has now been located, I can now tell you a little more about it, so please read on below.


It is one of my acrylics, painted with Reeves Acrylic paints on a pre-streatched canvass measuring 24"x18", un-framed or mounted, except with the sides being painted in sort of a wrap-around style. The whole thing was one of the first I hade done using my now much beloved Rosemary & Co Shiraz acrylic painting brushes, and as such, has a sort of special sentimental appeal to me.

But I paint to enjoy, and hopefully sell one or two to go buy some more paint and maintain the cycle - so away it goes.

Although all I basically did was try and have a go at copying the Master - I really did enjoy working on it, and had a great time looking, trying out and working in the ways of a great painter.

No expert as I am at all, but looking at Van Gogh's use of colour, and the way he uses his strokes etc really appeal to me and to millions around the world. As you may have read on other pages on here - I love the use of big, bright, bold colours. Maybe this bloke goes some way to accomplishing that!

Last piece of this blog is also good news - just how much can we all stand? As an addition to this sale I have also received two commissions; one to paint a scene of Whitby Harbour, the second to include Whitby Abbey for a "Born again Goth". How's that for a challenge and a bit of variety? There are no stipulations as to size or which medium to use, but be sure you will all be among the first to hear once it is decided!

Whatever your art - please enjoy it.

Paul

Wednesday 20 January 2010

Brushes

Hi there.

Not long since the last post (a day or so), therefore no new followers to welcome. I have been lucky having reached so many up to now, therefore I'm not downhearted.

What I am upbeat about though, is that after working my first children's art group of the year, I also got to enjoy my first adult group meeting too after an hours break for tea etc. YESSSS! - it felt good to pick up the brushes once again in anger - so to speak. It's alright using them whilst "home alone", where you can practice or potter about, but to use them properly in the company of other artists - amateur or not, is always a good thing.

One of the main benefits of being part of an informal group is the friendly banter that goes on, helping to lift and lighten anything that you may be nervous or uneasy with. There are times when you need to be alone, working solitary to ensure your maximum concentration, but also times for the help that you receive from people who see things you are working on, or perhaps struggling with, from a different angle, but still with an artisitc "eye". Last night was one of those nights, and I received help from everyone in the group, they all contributed positively to my latest project - a real team effort. Never be afraid or shy to ask!

My current project is an acrylic, and invloves me using my favourite brushes for this medium - Rosemary & Co's Shiraz - a really nice synthetic bristled brush that holds good quantities of colour but is responsive enough to your every touch. I like using these a lot, and amateur as I am - I highly recommend them.

Not enough time for me to post about my recently sold work, but I promise it will be in the next one, I just need a little more time to sort one or two bits out, so, whatever your art - enjoy it!

Paul

Tuesday 19 January 2010

Recent Events

Hello - quick tea-break for you!

A new member since last time is Rosemary - and I thank you Rosemary for taking the time to register as a  follower - I appreciate it. There are a few other people who are also trying to join as followers, but seem to be having trouble registering, so we may have some new friends in a few days time. I am trying to do what I can to help them, but I hope they are patient, persevere and my "help" pays off!

Last Monday the Life Drawing Group was not on, so that was that, and I was not well enough to go to the 2 kids groups and the adult group I attend locally. So, no art groups - no genius to work that out!

Yesterday it was unsure if the same Life Drawing Group was on or not, and I was the only one from our group who could make it, so I decided not to go, especially seeing as I'm not in possession of a phone number. This afternoon I start back at the kid's art group, and tonight I am looking forward to the adults group too!

So there you have it - short and sweet, so to speak. Don't worry though, I will get down to the next posting soon, with news of a sale! Yes - I do sell some of my works now and again.

Until next time - whatever your art - please enjoy it.

Paul

Thursday 14 January 2010

Sketching Part 3 Then!

Hi everyone - hope you have a few moments to spare!

Luckily the blog still continues to grow, and I'm really excited about it, with new followers who have taken the time to join since the last posting being - Bailey, JackT and Jenny - thank you all for joining and I really do appreciate your support.

The last couple of posts I have been, to be honest, a little worried about, thinking that they might have been a bit on the long side, so this one is going to be shorter - on purpose. By making it a little shorter it will give you all the chance to get your sketching practice well and truly running, and for one lady who is lagging so far behind already, to eventually get started (she knows who she is, but we don't mention names to purposely embarass folk, do we J..  whoops, almost let slip).

So all I really intend doing on this posting is to further show you what I mean by the use of shading, and how it can enhance your sketches. Below I have posted 3 sketches - done as I have told you before - light pencil, then ink pen over when you are happy with them, then lift off the pencil with the soft putty eraser. These are not my originals - I never lay claim to anything that is not completely mine, but they do show what I mean quite well. Simple lines can help dramatically, but also note the lack of a background leaves them "floating".


 Well I hope this is enough to help guide you along what I am trying to explain. A simple line can show, on this occasion, the woodwork of the handles, and then the criss-crossed lines showing differing levels of shading, tone and texture all go to complete the subject. Now imagine these done with a background, be it on the floor as if they were standing upright, or with back shading, as if leant up against a wall etc.

Just in case you were wondering, they are old style peat cutting tools - now you can sleep!

Until next time, whatever your art - enjoy it.

Paul

Thursday 7 January 2010

The Great Pencil Case

Greetings - just hang on while I tie up the iceberg!

Customary as it is for me to firstly offer a welcome to new followers, here are the names of those who have joined since the last post: Jenny, Ian and ......... a Weasel?

Right, as you all munch your way through the last of your end of year rations, your turkey stew, broth, soups etc, I'll try and get down to writing part 2 of The Great Pencil Case - snowfall permitting of course (well there is Global Warming on you know).

Last time we went through all the mountains of gear needed to start sketching, and seeing as you have now got your pocket bulging full (yeah - right), lets try and make a start. Holding the pencil as described previously, we can now start to make our marks, but please remember that each mark you make really needs to be quite a light one - for 2 reasons. Firstly, if you make a mistake it's easier to erase using your newly acquired putty eraser. Secondly, if you wish to paint your sketch afterwards, then the lighter the marks, the less likely they are to show through on your finished work. Of course, if you want to be just plain awkward - then you can always go round your coloured in sketch when it's done with a permanant ink pen (only joking, I do it with a lot of mine) making them into essentially cartoons.

We are hopefully now making marks on paper (high fives alround) and are starting to put together some shapes. There is little I can do regarding your subjects or the lines and marks you draw to initially portray your subject. A lot of it is all down to practice, and looking at your subject. I mean not just looking, but really LOOKING at your subject. If you have it, time spent studying what you are looking at - the lines, the shapes, is well spent but once you have done what you are happy with, then try and add some interest and character to your work by using varying degrees of shading. You do not have to simply shade everything the same tone of grey, but by using subtle marks you can achieve quite a lot. Simply following the lines or curves of your subject when shading will enhance it too.

Try doing one area of your shading by using the pencil on its side, and make diagonal marks, but keep them close together. That gives you a light tone - good to start with. To increase the depth of shading, go over the same area with, again, diagonal marks, but in the opposite direction - basically ending up with a criss-cross effect. By experimenting with this effect, you can achieve quite a surprising amount of varying shadings. Remember - each "layer" you put on, makes the area that bit darker, and there are usually some areas that need to be really dark, so just go ahead and press down a little harder than you normally would to achieve this. It may sound complicated at first, but as they say - a picture paints a thousand words. It may well do, but we are sketching here so may have to make do with a couple of hundred!

To help you with your sketching, never be afraid to have a go at drawing simple shapes. Things like boxes, balls, cylinders, cones etc are, if you look carefully, what a lot of objects are simply composed of, and by getting to grips with these simplified shapes, your sketching will improve. Also don't forget to include any shading, running it in the direction of the curve of a ball etc - and it will look twice as good!

Now - you are feeling really confident - right! No? Ah well, it's early days yet, so don't worry. But, when you feel happy enough, then go for a set of drawing pens, and have a go with them. I use black Pilot Pens of 4 varying thicknesses: 01, 03, 05 and 08 sizes. Use them as you do with your pencils, the only difference  being that you cannot erase them, but don't panic - by not being able to, it can really help give you the confidence to tackle your chosen subject. Plus, on a little cheat line, once you have done something you are really pleased with in pencil, then you can always go over it with the pens, then erase the pencil! Cheat ye not - it's called "Artisitc License".

OK - as promised - I will try and include more pictures this year - so here are 2 examples of what I have done - initally sketched in pencil, then gone over with the ink pens when I was satisfied with them. Note the crossed hatch shading to try and give it some simple depth and shape.


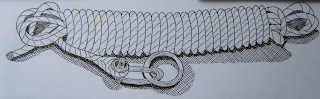
This sketch has some shading around its base,
enabling the image to look like it is anchored
down to something - not floating in air.
It's important to do this with your work too.  


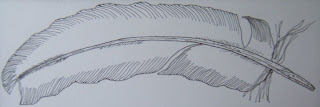
                                                                                                                                                                On the other hand - this feather doesn't have any. Maybe it's because it's because it's lighter than air! Something like this you may just get away with, but you must always try and use something to physically anchor your work down to a surface, as nothing floats round in real life.

So, there we are - you are both happily sketching away like there's no tomorrow filling book after sketching book with all manner of subjects. And you know - that's one of the beauties of this. A good sketchbook is like a visual diary; an old friend to dip into again and again; something that gives you deeper memories as each sketch is your own, and you remember it all the more as you have taken time to really sit and look at your subject. Photo's are often very good, but a good sketch of which you are quite rightly proud, is even better!

Until next time - whatever your art - enjoy it!

Paul

Monday 4 January 2010

Stand By Your Pencils!

Why, hello there - nice of you to drop in, and a Happy New Year to you!

Well, it's Monday, January 4th 2010, and this is the day that most people here (England) are all officially back at work, maybe throughout most of the World, so I thought I would too, hence the blog post!

But firstly I would like to welcome the following people who have joined since the last posting. They are - Elisha, Fiona, Bailey and Banjo. Thank you for making the effort to join, and I appreciate it.

This time seeing as it is a New Year, new start etc, I would try and encourage some of you (those who have made resolutions, and I know who you are), to at least pick up your pencils and have a go. But what sort of pencils, will any old thing do; what paper should I use - anything? Basically yes - if you are not too bothered about your end results; but if you do mind, then a little investment of pence - literally, is all that's needed.

The pencil your child has, or the one you keep by the phone etc is probably no good. The lead in it is far too hard, and sharpened to a needle-like point is no good for drawing and sketching - but excellent for what it is designed for - writing. Usually it has the letter "H" somewhere on the side - as in "H" for "Hard". I use a softer leaded pencil - a 2B, which I find suits my needs. Some people, myself on occassion, will use something like a 4B, which is very soft indeed. One this soft gives a darker, broader stroke, and there are times when using something like this will be of use. Beware though that because it is a softer lead - it also smudges easier too! Pencils are often only pence each, and I suggest you buy 2, the reason being I will tell you later!

As for paper, well it pays to use quality cartridge paper, nice, smooth, clean and white, but there are also rougher textured papers if you need more of a grainy (like tree bark) effect to your work. You can buy them in a variety of sizes - A6 upwards, and I like the spiral bound ones, so you can fold the booklet flat. They also come in cardboard or hard backed versions. It's often easier to buy an A6 or A5 size to start with - easy to carry around and store. If you are shy, a smaller pad is easier to use and more descreet. Most art or multi store style shops sell them, and they are not expensive. To complete your "kit", you will need an eraser, and the best sort to use is a soft putty one, again under £1. A harder school style "plastic" eraser often leaves marks and dirty smudges. A putty one is quite surprising the first time you use it, don't rub hard, and it gently lifts off your little errors, leaving your surface cleaner too. You can also nip and make points with it, to lift out or erase small places and marks.

Once you have purchased your pencils, use a small hacksaw or very sharpe knife and cut them into half at least, even into three! Then, with a sharp knife, cut back plenty of the wood and leave a nice, long piece of lead, but not pointed. This enables you to use the pencil held sideways in your hand, and not like you are about to start writing with it. Like I explained previously, use your nails to protect the paper from your hand, grease, dirt etc. This cutting also gives you the advantage of having "extra" pencils - so you will never lose them all, handy if you are out for the day or on holiday etc! Have a look at the photo I have posted and see the differences I have been talking about.


The yellow ochre coloured pencil is a normal length hard writing one. The two top ones are both 2B pencils, showing that you can get three sketching pencils out of one, and the bottom black pencil is a heavy 4B - just look at the thickness of the soft lead compared to the others! So for probably less that £5 you have half a dozen pencils, an eraser, and a small 20-odd page sketch book.

Right - we are now all set to have a go - but - like all good cliffhangers - you will have to wait for the next post to progress any further!

Whatever your favourite art is - enjoy it.

Paul